Vodafone Station as ATA
A little guide to configure your Vodafone Station as an ATA adpter. AKA use your own OpenWrt router to establish conneciton to your ISP and cascade the Vodafone Station to handle only the phone traffic.
Why
First of all, why would you ever want to do this? Aside from all the standard benefits of OpenWrt (reliable, customizable, additional software/plugins, advanced configuration) the modem provided by many ISP (as an example I will consider my experience with Vodafone as an Italian user) is locked down and completely under the control of the ISP.
In the case of the Vodafone Power Station (standard modem/router provided by Vodafone as of September 2020) they even went as far as requiring an email address to change the default password used to access the web interface. Not only that, Vodafone can potentially access all of the traffic inside your LAN which is a great concern for privacy. Furthermore, the updates for the firmware of the modems are automatic being pushed directly from Vodafone as soon as you plug in your Vodafone Station Revolution for the first time.
What does all of this result in? At worst complete loss of privacy, at best random reboots of the modem or loss of connection which might be due to updates or something else. In any case when using the ISP provided modem you have no tools to troubleshoot or understand what the hell is going on.
Why does Vodafone (and other ISPs) do this? Mainly all these measures are taken to ease the job of customer support as they can easily troubleshoot most of the problems when inexperienced users call in without requiring their intervention.
Alternatives
The alternative is to use your own modem/router. Unfortunately (at least here in Italy) for a few years all new telephone lines work on VoIP (instead of the old “splitter” for ADSL and phone), which means that if your modem is not equipped with an ATA adapter (allowing to use old analog phones on VoIP) you will need to buy an additional one which will set you back more than 40€.
Thankfully with this method is possible to use the Vodafone Power Station to handle only the phone part, leaving the data part to our OpenWrt equipped modem. The same method should also work with older Vodafone modems such as the Vodafone Station Revolution, currently I don’t have one so I haven’t been able to test it.
Before Beginning
This tutorial requires you to have a modem router combo equipped with OpenWRT, at the time of writing two well supported devices (for both ADSL and VDSL) are the TP-Link TD-W8970 (the one I own on which this tutorial is based) and the BT Home Hub 5 (Type A) which goes on sale on ebay for about 20€ including shipping, it has the same hardware as the TD-W8970 but more RAM and Flash memory, plus AC WiFi. There are also other models supporting OpenWrt, do your research and select the one that fits your needs best. You will also need an ethernet cable and a PC.
During this tutorial I will use the terms modem and router interchangeably as we are working with a device that acts as both.
The Idea
The idea is to use two routers setup in the following way:
- Our OpenWrt equipped router will be handling all the data traffic
- The Vodafone Power Station will be handling only the phone traffic without having access to the data traffic
How do we actually implement this?
The Setup
The setup that we will be implementing is shown in picture below.
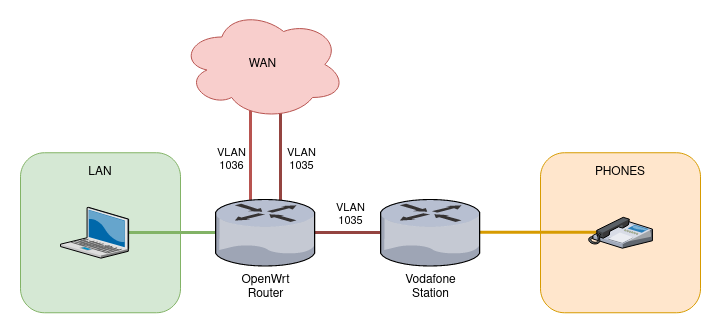
Vodafone divides the traffic for data and phone on two separate VLAN respectively 1036 and 1035. We are going to take advantage of this by placing our OpenWrt router and rerouting all the traffic of the phone VLAN through an ethernet port that will be connected to the WAN port of the Vodafone power station. It’s important to understand that there are two PPPoE connections here:
- One PPPoE for the data traffic created by our OpenWrt router
- One PPPoE for the phone traffic created directly by the Vodafone Power Station, meaning that all the traffic incoming on the VLAN 1035 is forwarded directly by the OpenWRT router without removing the VLAN tag.
How To
xDSL connection
The first step is establishing the xDSL connection.
Plug in your OpenWrt router to the line, open the web interface and log in.
On the top menu select Network → Interfaces
Go on the DSL tab and setup the correct parameters as shown in the picture below.
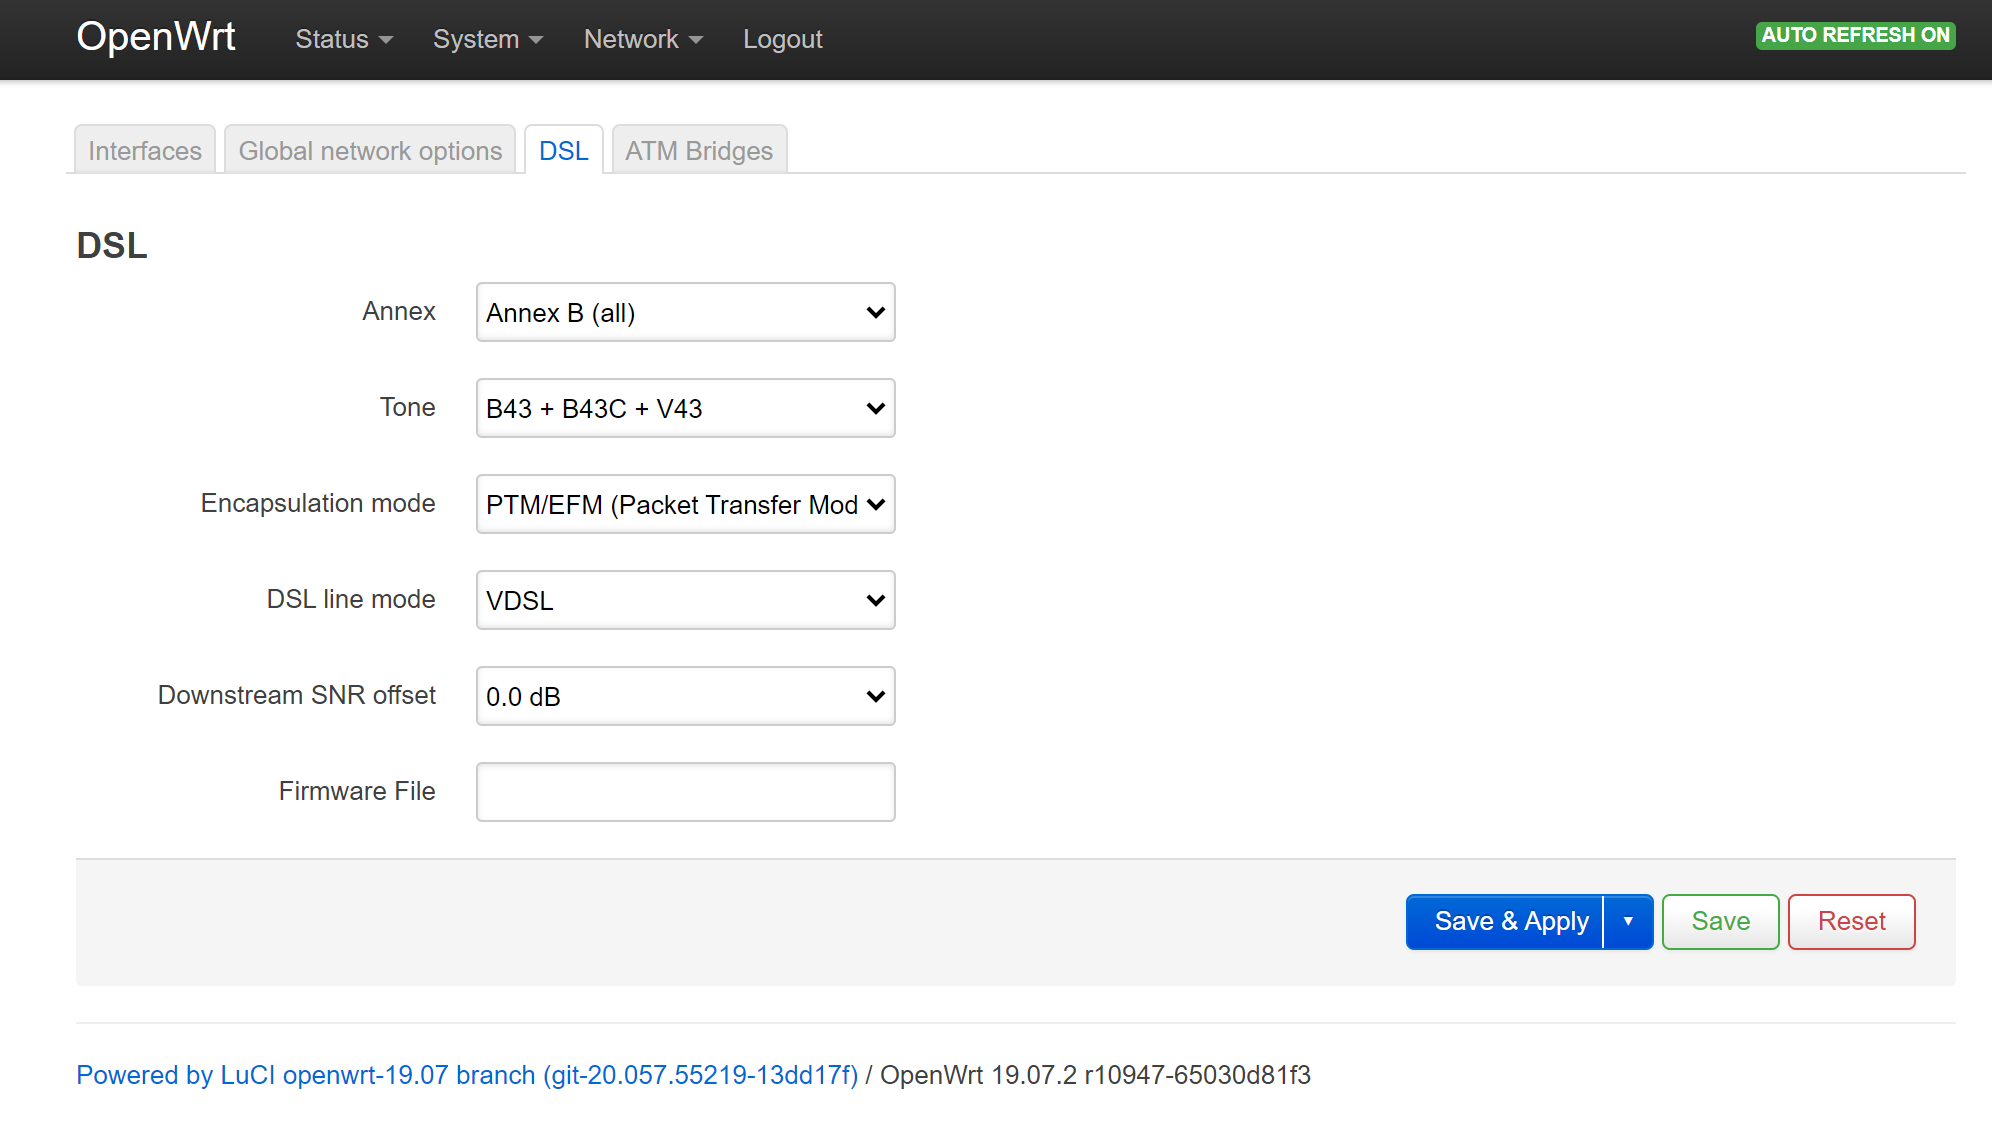
For a VDSL connection with Vodafone Italy I’m using Annex B, Tone auto and PTM encapsulation. Once you are done click Save & Apply than go on Status → Overview and wait for the modem to establish the DSL connection. Give it a couple of minutes, if it doesn’t work try rebooting your router.
Although you should now have a DSL connection, you still have no access to the internet because you need to setup the PPPoE connection with the ISP so head back to the Network → Interfaces tab.
OpenWrt provides by default different network interfaces, most notably LAN, WAN and WAN6. In this setup WAN6 is not needed (this might differ for you depending on your ISP) so I like to remove that to clean up the configuration. Additionally, I also like to clean up further by deleting the default ATM bridge in the “ATM Bridges” tab.
We need to configure a PPPoE connection on the WAN interface so click the Edit button and fill in the correct settings which are normally provided by your ISP, a quick google search will be your best friend here. In my case, the interface is configured as shown in the picture below. At the time of writing the default username and password provided by Vodafone in Italy are vodafonedsl.
.
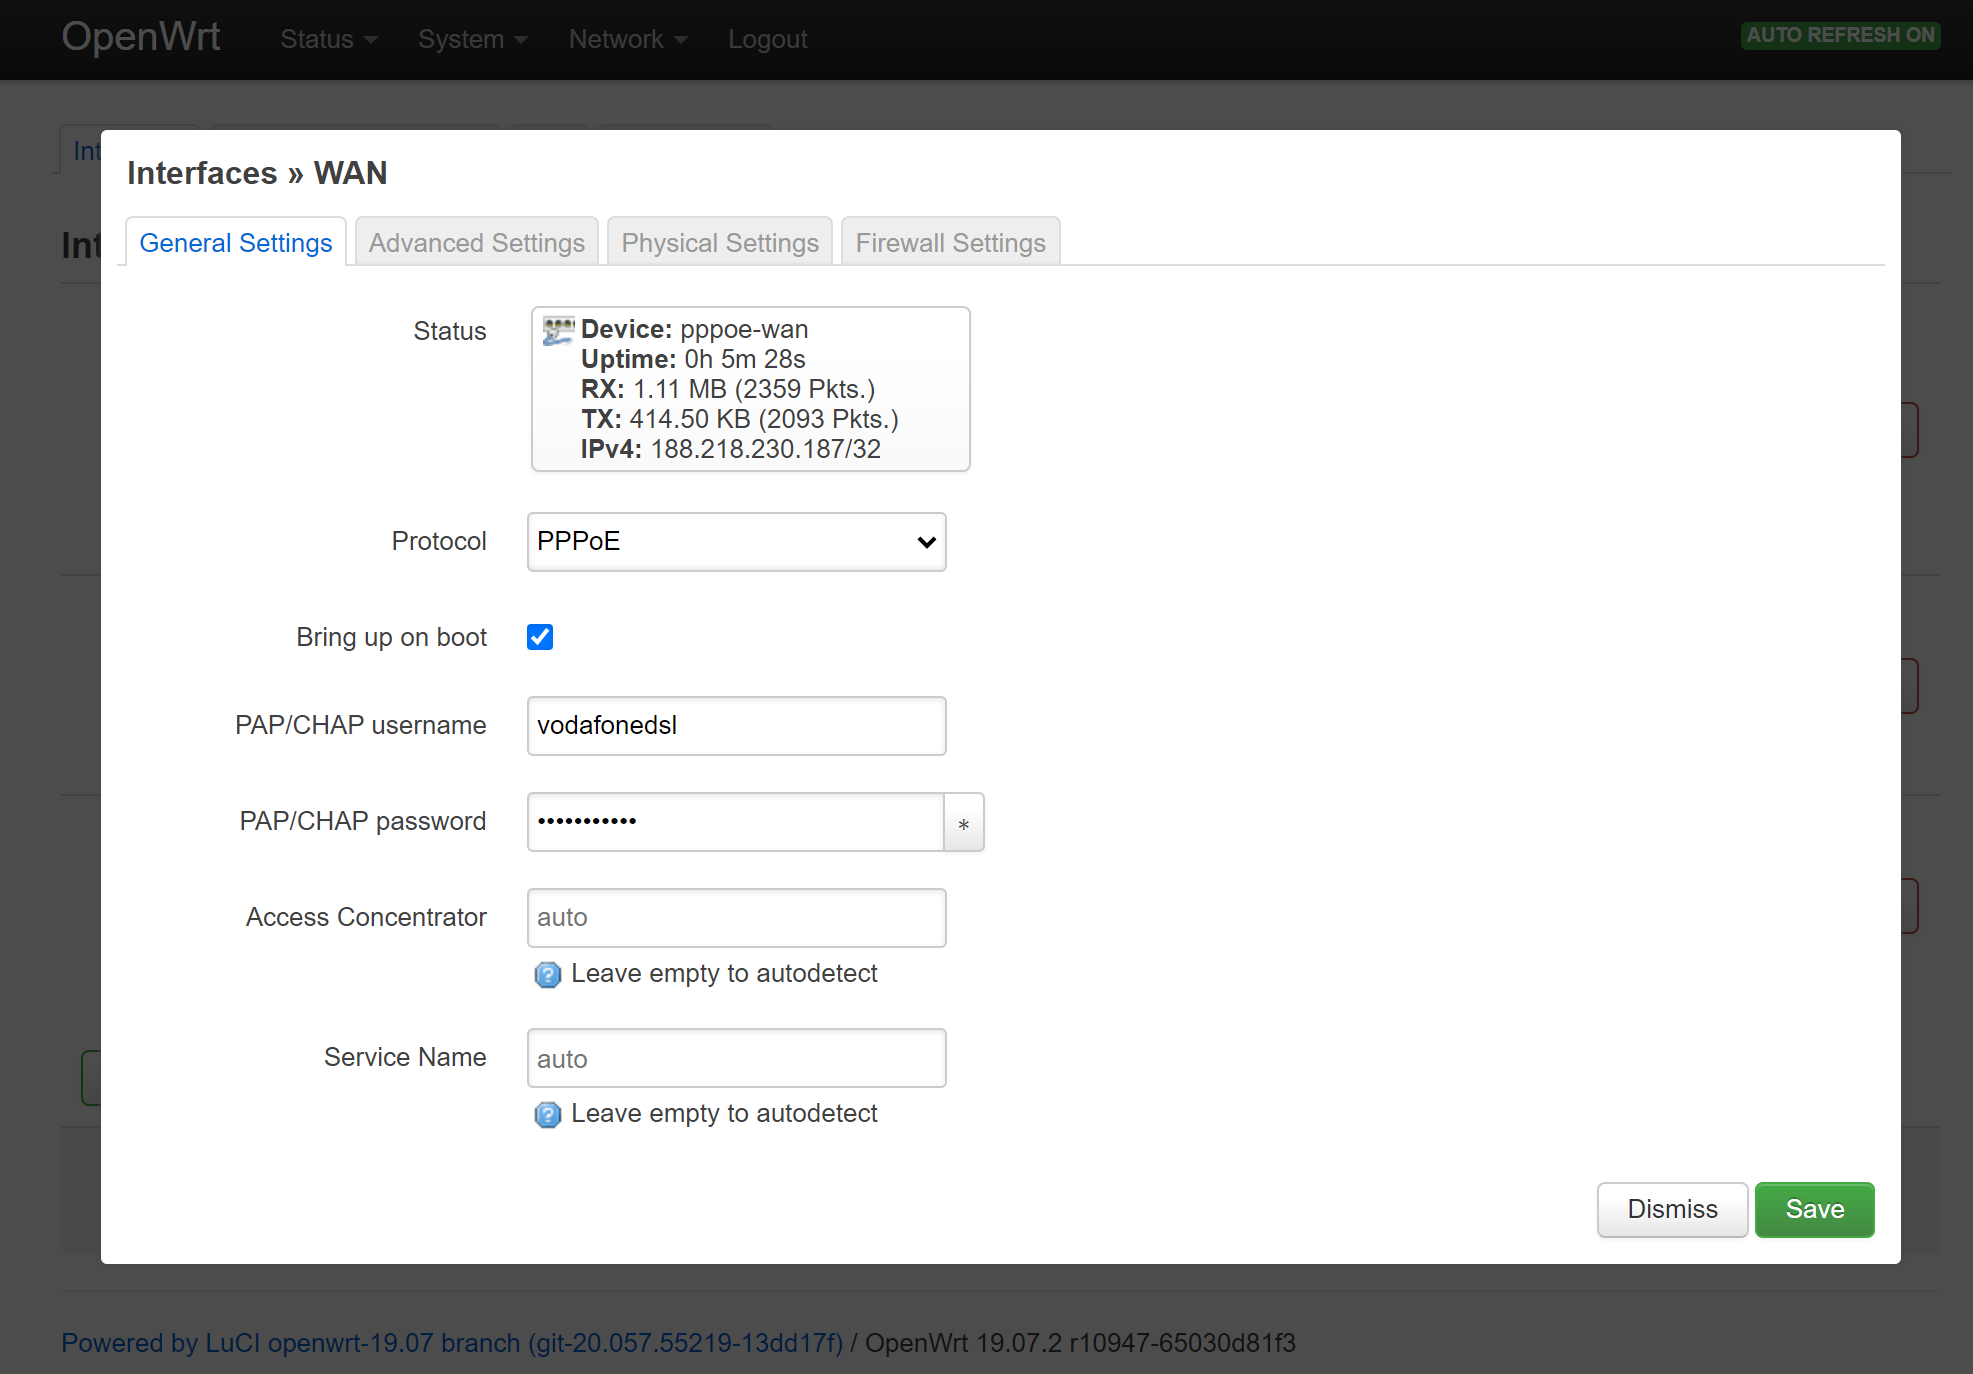
Click on Save than Save & Apply.
You will notice that there is still no internet access, this is because we need to configure the PPPoE connection to use the correct VLAN for data. At the time of writing there is no way to do this form the web interface, instead we will need to do it from the CLI.
SSH into the router, on Linux based OSes you can open a terminal and type:
ssh root@192.168.1.1
On windows you can use a free utility such as PuTTY or MobaXTerm.
Go to the config folder with:
cd /etc/config
And open the “network” file with:
vi network
Now search for the wan interface and modify the line with option ifname by appending “.1036” after the name of the interface. The resulting configuration should look something like this:
config interface 'wan'
	option ifname 'dsl0.1036'
	option proto 'pppoe'
	option username 'vodafonedsl'
	option password 'vodafonedsl'
Leave the other options untouched. Press ESC to switch to command mode then type “:x” and press ENTER to save and exit.
Restart the network service with:
service network restart
You should now have a working internet connection, if this is not the case reboot the modem and wait for the connection to be established once again.
Voice Routing
The second part consists of routing all of the packets our OpenWrt router receives on the VLAN 1035 to the Vodafone Station.
First of all we need to assign one of the ethernet ports of our OpenWrt router to this VLAN, which will then be connected to the WAN port of the Vodafone Station.
Head on over to Network → Switch.
Click on Add VLAN< and configure the settings as shown in the picture below:
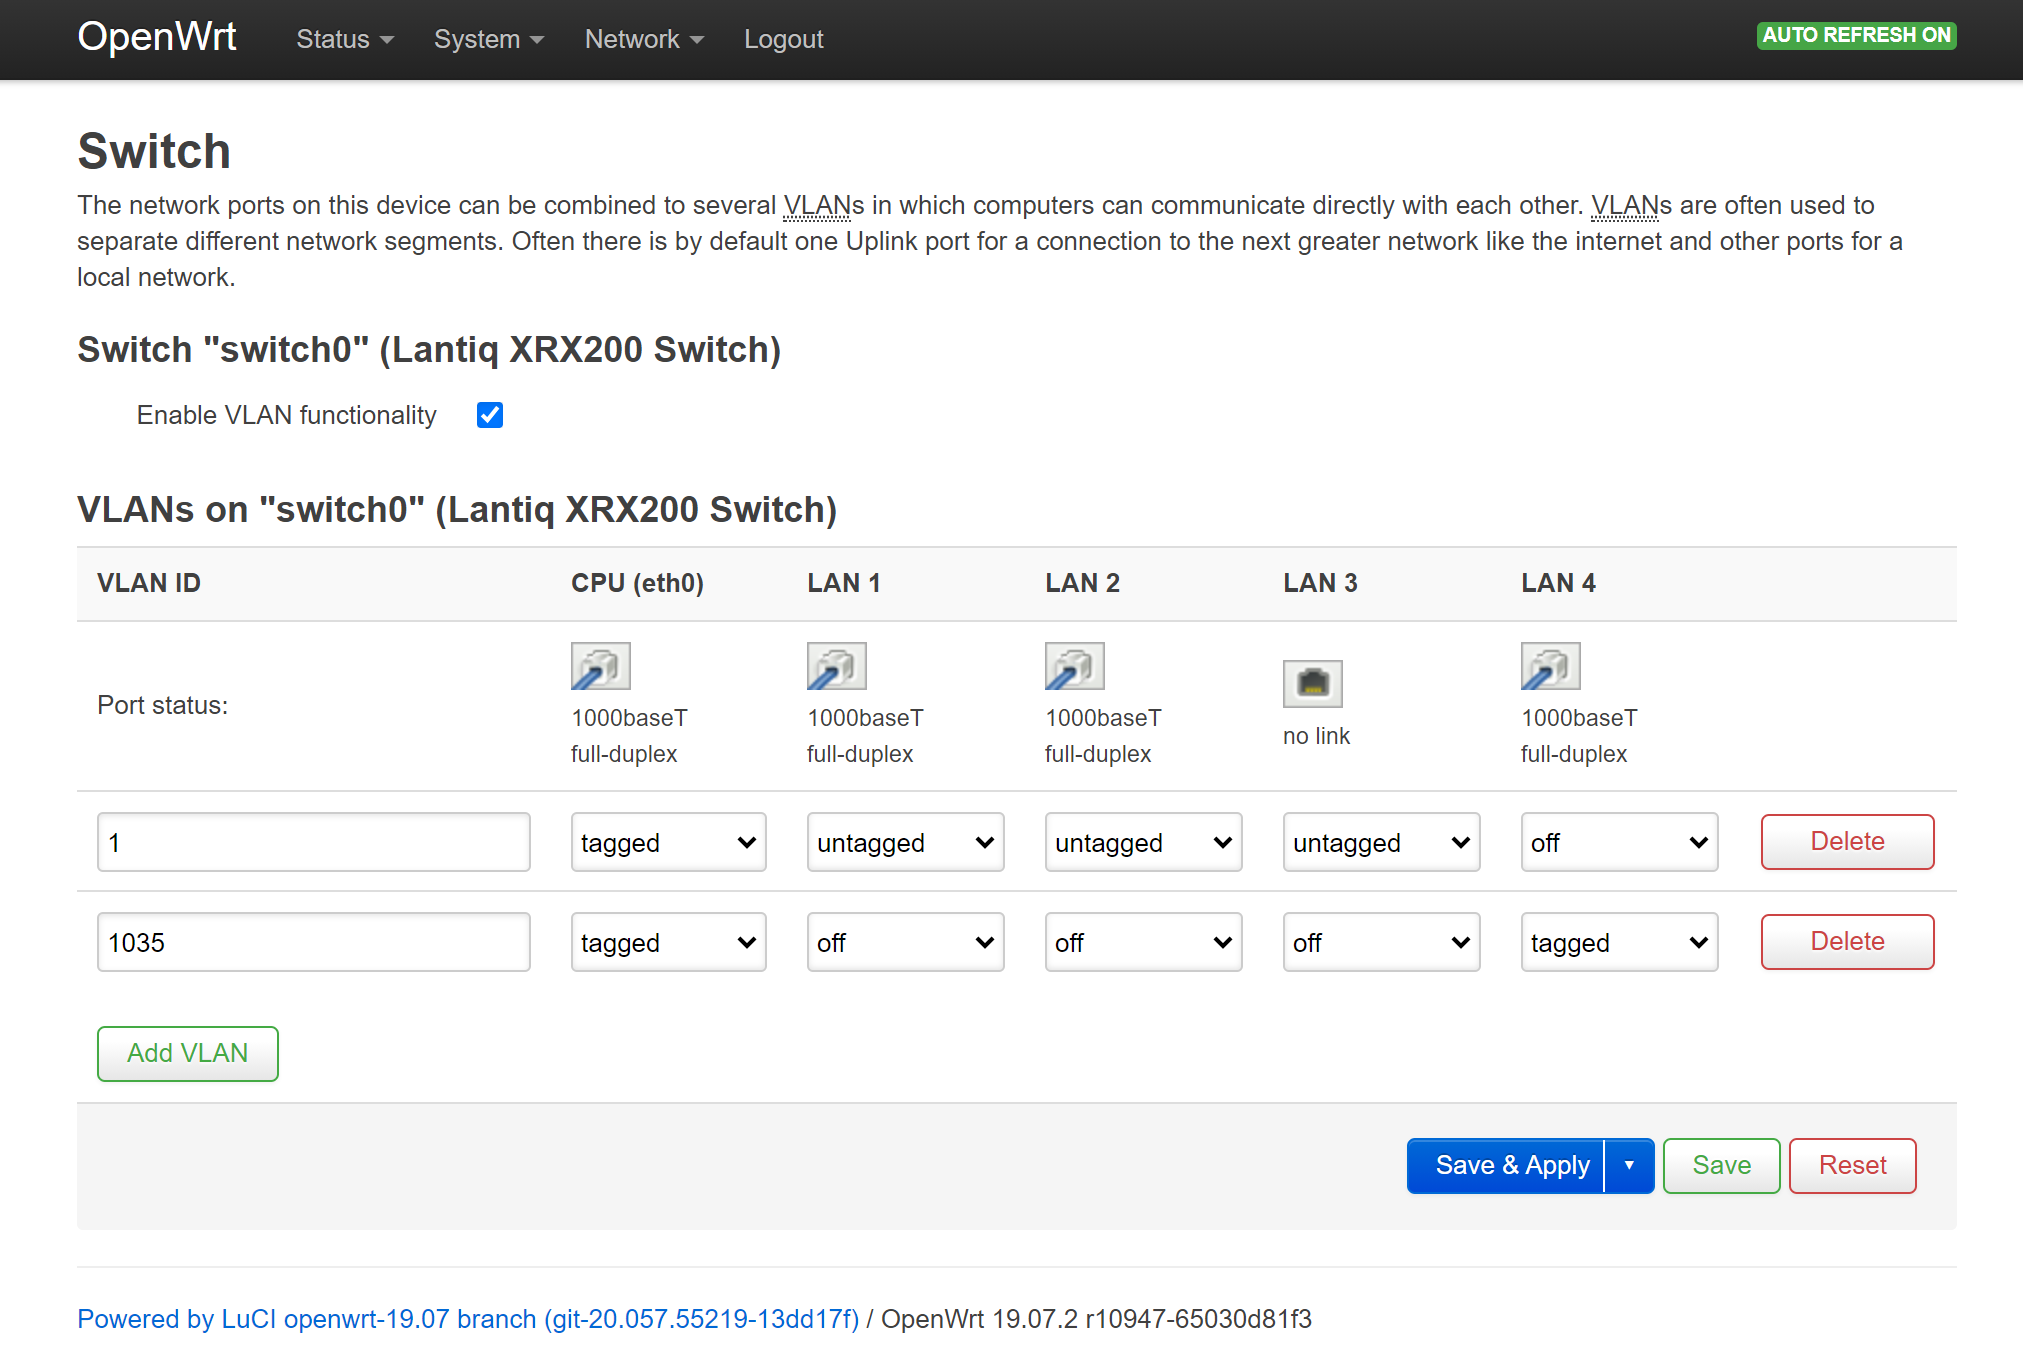
You may want to change these settings slightly depending on the port that you want to select, the important part is that for VLAN 1035 the CPU interface (eth0) as well as one of the ethernet ports are both selected as tagged, additionally the ethernet port choosen must be set to “off” in all of the other VLANs. To understand which physical port corresponds to the selected one, check the OpenWrt page for your router or complete all of the configuration steps and then connect your PC to all of the ports until you find one where you have no internet access.
Now head to the Network → Firewall page.
And under the “Zones” section click on Add<, we will be creating a new zone named “voice” for the phone traffic. Configure the zone as shown in the picture below:
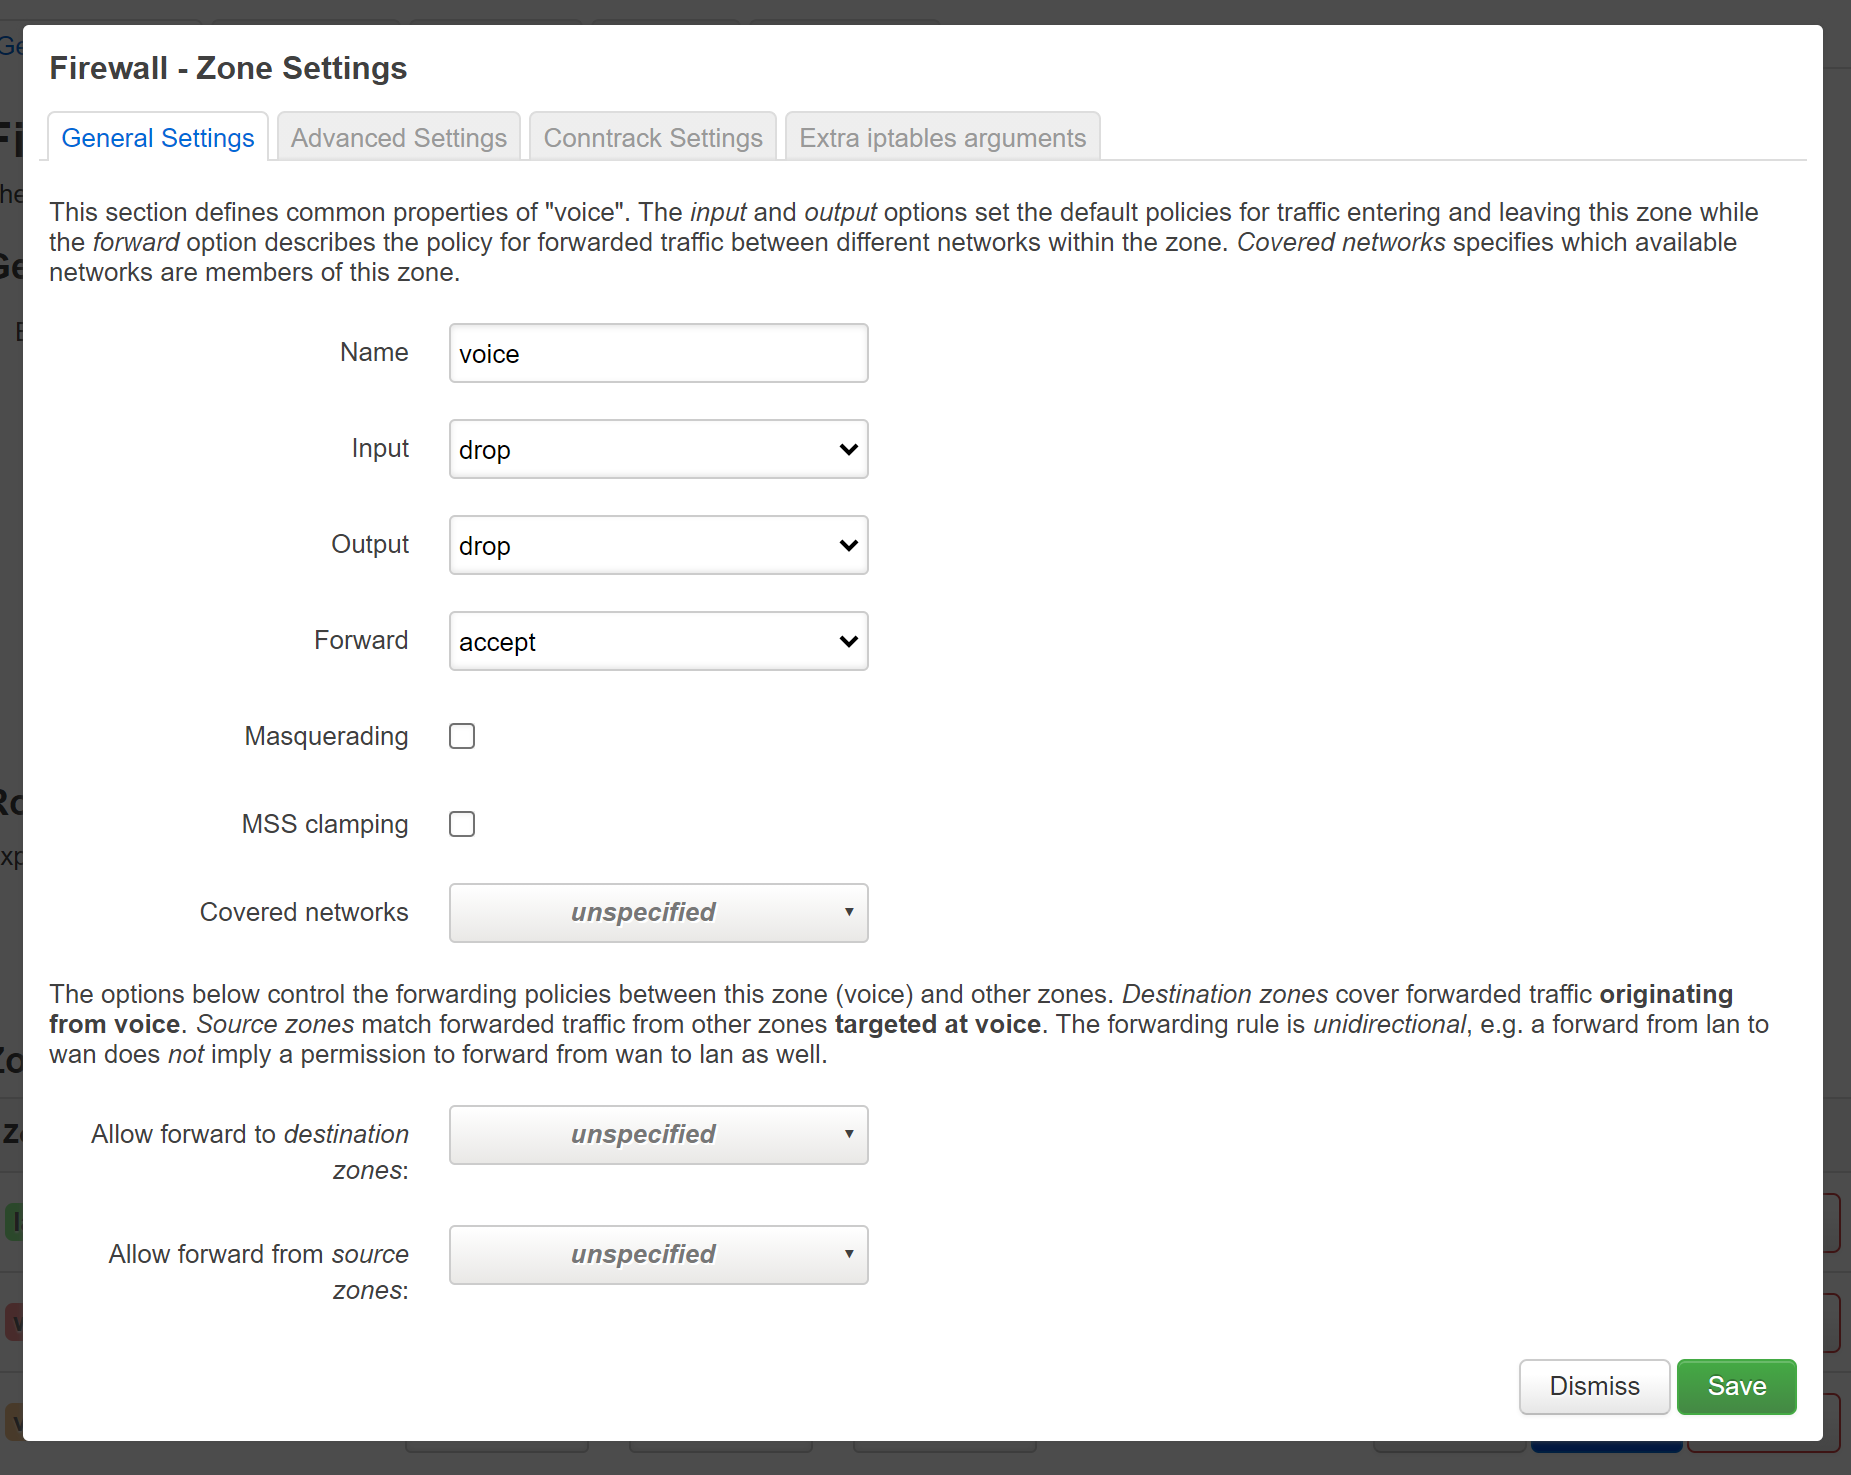
Leave the “covered networks” settings empty, we will change it later. The Input, Output and Forward rules are set in this way because we don’t want any interaction from this zone with our OpenWrt router which needs to be transparent and only forward the traffic.
Head once more to the Network → Interfaces page.
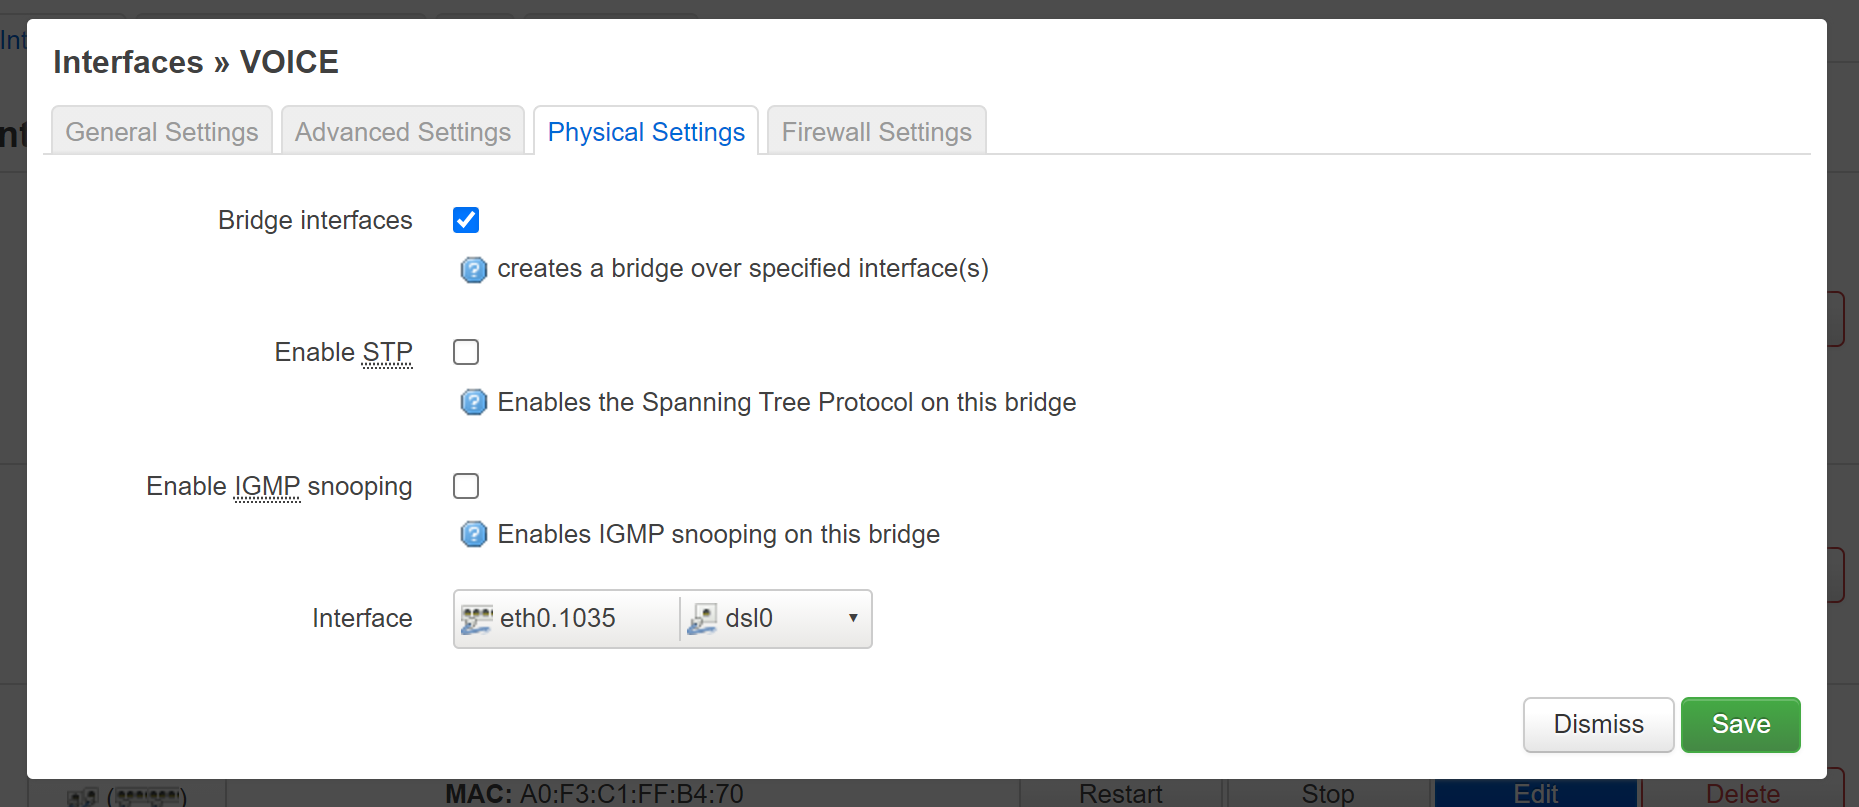
Click on Add new interface…, name it “voice” (it is not required to have same name as the firewall zone previously created but in this case it fits our application) and select “Unmanaged” as protocol (remember that the PPPoE connection for the phone data is established directly by the Vodafone Station and not from the OpenWrt router) than click Create interface. In the “Physical Settings” tab, check the “Bridge interfaces” box and select the newly available interfaces eth0.1035 and dsl0 as shown in the picture below.
 Under the tab “Firewall Settings” assign the interface to the voice zone previously created than hit
 Save< and Save & Apply as always.
Now we need to do the same procedure as before and configure the dsl connection to use the correct VLAN, only that now we are using VLAN 1035 for the phone traffic. SSH back into the router and edit the /etc/config/network file once more, this time edit the voice interface adding the suffix for the correct VLAN after “dsl0”. The resulting configuration for the voice interface should look something like this:
config interface 'voice'
	option proto 'none'
	option ifname 'dsl0.1035 eth0.1035'
	option type 'bridge'
After the configuration has been updated restart once again the network services as before or reboot the modem.
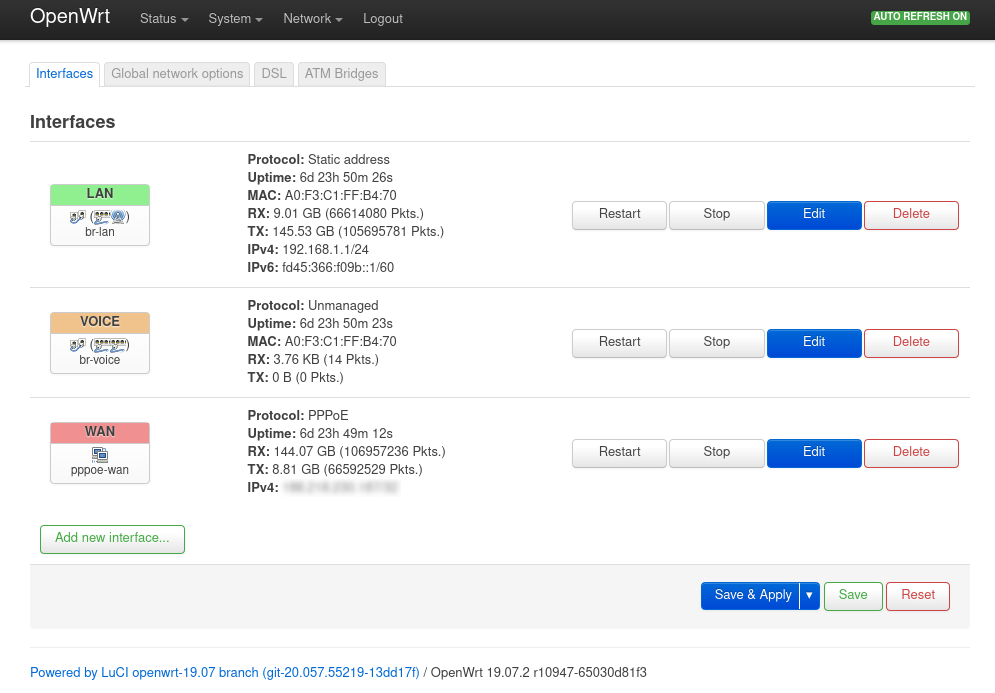
Finishing Up
Now the configuration is completed, go one last time to Network → Interfaces, your page should look something like this:
Now you can connect the WAN port of the Vodafone station to the correct port on the router that was configured as a bridge.
In a couple of minutes, the phone indication led on the Vodafone Station should stop blinking and you should be able to make and receive phone calls using the phones plugged into the port of the Vodafone Station.
As a last touch, connect your PC to one of the LAN ports of the Vodafone Station, open up the web interface, log in, select “Expert User Mode” and disable everything you can (except the phone of course). Disable the WiFi to avoid interference with the one of your OpenWrt router, disable USB ports to save power and even the notification leds if you feel like it. Once you are done, remember to unplug your pc and connect it back into the OpenWrt router or you won’t have any internet access.
Congratulation now your Vodafone Station is configured as an ATA adapter and your ISP can no longer mess with your router!
If you have any problems I provide a copy of my configuration for reference here.
You can also contact me at danielegiuliani0@gmail.com.